Showing posts with label recipe. Show all posts

Monday, September 4, 2017

Granola Recipe aka "Keeping the College Kids Well Fed"...

Earlier today I posted a picture of a pan full of delicious granola that was in my oven...making my kitchen smell soooo good...


I sent both of our college kids on their way this past month with a box of food.  You know...in case the cafeteria doesn't feed them enough.  Things like nutella, peanut butter, popcorn, dried fruit, granola bars...all kinds of things...and of course homemade granola!  Bonnie, a friend of mine, gave me this recipe a while ago, and it's the only granola we've eaten ever since!

One of the kids asked for a refill this week, so this morning I threw a batch together.  It's that easy.

A bunch of you on Facebook, asked for the recipe...so here it is!

HEALTHY GRANOLA

4 c. old fashioned rolled oats
1 1/2 c. raw nuts and/or seeds (I used sliced almonds)
1 t salt
1/2 t cinnamon
1/2 c melted coconut oil (she has used olive oil and likes it, but I prefer the taste of coconut oil)
1/2 c maple syrup or honey (I use 1/4 c of each)
1 t vanilla extract

2/3 c dried fruit (optional)

Preheat oven to 350 degrees. Line a large, rimmed baking sheet with parchment paper. In a large bowl, combine oats, nuts/seeds, salt and cinnamon.  Stir thoroughly to combine.  In another bowl, mix the melted oil, maple syrup/honey and vanilla together.  Pour over the dry ingredients and mix well.  Spread the granola evenly on the lined baking sheet.  Bake until golden, about 21-23 minutes.  (I set the timer for 15 minutes, stirring halfway through baking).  If you prefer to have chunks of granola for snacking as opposed to a cereal, don't stir, but be careful to not let it get too dark.  Allow the granola to cool completely, undisturbed before adding dried fruit.  Store in an airtight container at room temp for 1-2 weeks, or in a sealed freezer container for up to 3 months.

Enjoy!


Tuesday, August 29, 2017

Still Canning Tomatoes...

It's been a few weeks since I posted...and guess what?  I'm still canning tomatoes!

I made three batches of salsa, one batch of spaghetti sauce (I have some left from last year) and I'm on my second batch of tomato soup today!

Oh...and in there, a friend came and picked several buckets full of tomatoes when I was gone taking Jenna to college in Kansas.  They just keep growing and ripening...yay for those of us who like tomatoes!

Yesterday when I got up, I was planning to make a fourth batch of salsa...but I read a post on face book by a friend who made soup, and so I changed my plans.  I think she froze hers, but I found a recipe that looked good that was for a pressure canner, and so I gave it a try.  I think the kettle full of veggies looks so pretty!


Such an easy recipe...and I got ten pints, plus enough for our supper last night...


Normally, a pint jar of soup concentrate wouldn't be nearly enough for our family...but I'm having to retrain myself to think in terms of cooking for two, not four.  Both kids are away at college, so it's a season of change here in many ways.

Here's the recipe, if you'd like to give it a try...

TOMATO SOUP CONCENTRATE

8 lbs ripe tomatoes, unpeeled, quartered
1 cup celery, diced
2 cups onion, diced
1 cup fresh parsley
6 bay leaves
3/4 cup clear jel
1/2 tsp black pepper
2 1/2 Tbsp salt (optional...I used less)
1/4 cup sugar (optional)

Place tomatoes, celery, onion, parsley and bay leaves in a large stainless steel pot.  Cook gently, uncovered, until tender, stirring as needed.

Press through a food strainer, or sieve into a large stainless steel or enamel cast iron sauce pan.  

Set aside 2 cups of puree to cool.

Whisk together clear jel, and cooled tomato puree to form a slurry.

Bring soup back to a boil and stir in the slurry.  (This is when I added the salt, pepper and sugar)  Continue to boil for about two minutes, until it thickens.  *Soup will not resemble commercial soup concentrate, but rather a slightly-too-thick tomato soup.

Ladle into pint or half pint jars and fill to 1" head space.  Wipe rings and set two piece caps.

Process in pressure canner...at 10 lbs pressure for a weighted gauge and 11 lbs pressure for dial gauge...for 25 minutes.  Do not use quarts for this recipe

When ready to make the soup, just heat with equal parts liquid such as milk, water or chicken broth.


I kept some extra out for our supper last night, and we were pleased with the taste!  Grilled cheese sandwiches and fresh lima beans from my Mom's garden made a tasty meal!  


Thursday, August 11, 2016

Refrigerator Dill Pickles...

The heat and humidity are back in full force these past few days, and I have little ambition to get things done other than what's absolutely necessary.

However...my tomatoes are ripening fast, and I've picked bushels (literally!) of cucumbers, so I'd better get busy canning.  I was planning to make salsa today, but we are having to unexpectedly replace one of the pressure tanks in the basement, so that's on hold.  You can't can without water!

So...since my day has been all mixed up today, it's time for another recipe!

These were the simplest pickles to throw together...


Refrigerator Dill Pickles...

3 1/2 cups water
1 1/4 cups vinegar
1 Tbsp sugar
1 Tbsp sea salt
4 cups cucumber spears
2 cloves garlic, whole
2 heads fresh dill (can substitute dill seed if fresh dill is out of season)

*Stir water, vinegar, sugar and sea salt together in a saucepan.  Bring to a boil; remove from heat and cool completely
*Combine cucumber spears, garlic cloves and fresh dill in a large glass or plastic container.  Pour cooled vinegar mixture over cucumbers.  Seal container with lid and refrigerate for at least 3 days.

I made these on Tuesday.  I know it's not been three days yet, but I cheated and tasted a dill pickle spear this morning.

They're nice and crispy, and I think we're going to enjoy them!

Saturday, January 30, 2016

Friday's Hunt #5...

I enjoy having a set of guidelines for blogging on Fridays, so here we go again!

This week's prompts are...

Starts with "E"...

I could have chosen and easy E word and gone with eggs...I have plenty of those right now, but instead I chose the word EAT.  We all do it...and it's oh so much more fun if we have a good recipe to try!  Here's a photo of what we were eating last week...

Avocado Mango Salad
Last week, Jim and I were going to a meal with an Indian theme, and I was to take a salad.  I googled Indian Salads, and this recipe popped up.  It was absolutely delicious!  Here's the recipe if you'd like to try it...I don't think you'll be disappointed!

AVOCADO MANGO SALAD

Combine the following ingredients in a bowl:

Lettuce, washed and torn
1 peeled and sliced ripe mango
1 peeled and sliced avocado
1 sliced red pepper

Dressing:
1 crushed garlic clove
1 tbsp lemon juice
1 tbsp olive oil
1 tbsp honey
salt and pepper to taste

Combine dressing ingredients, pour over salad and toss until well coated.

Chill and enjoy!

The second prompt is "Week's Favorite"...

I could have chosen just about any picture from the snow storm and called it my favorite, but this one wins...


It was Sunday morning, and folks were beginning to shovel out from the big storm.  Jim had just come inside from opening up for the milk truck and to warm up and have some breakfast, when out of the corner of my eye I saw one of our Amish neighbors walking up the road, kids in tow.  The two older girls (maybe 1st and 2nd grade ?) were carrying small shovels, and the two littler ones were riding on a plastic sled, pulled by their Dad. They had walked about a half mile to check on a couple who lives in the house you see in the picture. They discovered that Jake and Lydia were fine, and started their walk home when they noticed that the neighbor who lives to the right had just opened his garage door to begin what must have seemed like an overwhelming task.  No problem.  Melvin and his four little ones pitched in to help him, and in what seemed like no time at all, the driveway was clear! That's what you call being neighborly, and it's one of my favorite things about our community!

The last prompt is "Sky"...

I used this picture in my post about digging out, but I think this sky is so gorgeous I'll use it again here.  Not a cloud in sight the morning after the blizzard, and I just love the brilliant blue...


Here's another one, for good measure.  The sunrise this morning was beautiful...but only for a few minutes until the sun disappeared behind the clouds...


I just wish the tower and telephone pole didn't have to always be in the picture, but oh well, it's pretty anyway!

I hope your weekend is a good one!  Click here for more links to Friday's Hunt, with Teresa.

Thursday, May 16, 2013

Rhubarb Jam Recipe...

Last year, I picked up a cookbook that focuses on seasonal cooking...using what is fresh right now, to cook, right now.  It's full of great ideas!

Jim's Aunt gave me an armful of rhubarb yesterday, which is abundant here this time of year.  I had enough to make one batch of this delicious jam, as well as a small dessert that lasted all of about fifteen minutes.  :)


If you have access to fresh rhubarb, I'd suggest you give this recipe a try!

RHUBARB JAM

5 cups rhubarb, cut finely
4 cups sugar
1/3 cup strawberry jello  ( I used raspberry, because it's what I had on hand)

Mix rhubarb and sugar; let stand overnight.
Cook 5 minutes, and add jello.
Stir well, put into jars immediately, and seal.

You could also simply refrigerate it, as it won't last long, and only makes 4 jelly jars full.  The jam will be rather runny until it cools, but then sets nicely.  It is the simplest jam recipe that I've ever made.

My mouth is watering for a piece of bread from this recipe that is baking in the oven right now, spread with butter and some of my fresh rhubarb jam.

Thanks for the rhubarb, Aunt Marilyn!

Tuesday, April 30, 2013

Glenda's Bread Recipe...

Yesterday, partly because it was a rainy day...

...and partly because I was out of bread...

...and partly as a huge THANK YOU to our neighbors who helped us to chase our cows out of knee-high, wet rye grass at 9:00 am (criminal cows!!)...

I decided to bake some bread.


If you need an easy recipe for delicious home made bread, give this one a try!  I don't think you'll be disappointed.  I got this years ago from my friend Glenda.  Making it yesterday took me down memory lane...I miss her!!

GLENDA'S NO KNEAD BREAD RECIPE 
yield - 4 loaves

1 cup sugar
4 tsp salt
4 1/2 cups lukewarm water
5 Tbsp oil
3 Tbsp yeast
12 cups flour (scant)

Mix together first five ingredients.  (Glenda's notes say to mix the sugar and salt together first...sometimes I do, and sometimes I don't.  Yesterday I forgot, and it turned out fine)

Add flour and stir until incorporated.

*this is a no knead recipe.  Dough will be rather sticky.

Place dough in a greased bowl.  Cover and let rise for 1 1/2 hours.
Punch down, and let rise again.
Shape into four loaves.  Place in greased bread pans, and let rise until double.
Bake at 325* - 350* for 35 minutes.
Remove from oven and rub tops with butter.

Cool and enjoy!

(On a cool, dark day like we had yesterday, I put the dough in the oven with the light turned on to rise, and it worked great!)

Homemade bread is one of my favorite comfort foods.  Toast it, add butter and home made strawberry jelly, and ummmmmm...delicious!  I hope you enjoy it!


Thursday, February 14, 2013

Middle Eastern Lentil Dish

I've had food on my mind lately...can you tell?

Bear with me as I share one more delicious recipe that I came across recently, as I was browsing my cookbooks...


This isn't a recipe that initially sounded great to me...the combination of lentils and salad?  But then I looked at it more closely.  (I've always enjoyed the nutty flavor of lentils, but not everyone in my family feels the same way)  I thought the salad also looked simple and good, so I decided to give it a try.

Good decision!

Middle Eastern Lentils

Lentil Mixture:

2 large onions, chopped
1 Tbsp olive oil
3/4 cup uncooked brown rice
1 1/2 tsp. salt
1 1/2 cups uncooked lentils, rinsed
4 cups water

In a large kettle, saute onions in olive oil until soft.  Add rice and salt.  Cook over medium heat for 3 minutes.  Stir in lentils and water, bringing to a simmer.  Cover and cook until ingredients are all tender..about 50-60 minutes.

Salad:
1 bunch leaf lettuce (or one bag pre-washed salad greens of your choice)
2 medium tomatoes, diced
1 medium cucumber, peeled and sliced
2 green onions, chopped
1 red bell pepper, diced

Dressing:
2 Tbsp olive oil
2 Tbsp lemon juice
1/2 tsp paprika
1/4 tsp dry mustard
1 clove garlic, finely chopped
1/4 tsp salt
1/2 tsp sugar

Mix dressing ingredients together in a jar or container with a lid.  Shake well to mix ingredients, and pour over tossed salad.

Serve lentil mixture on a plate, topping with salad.

Give it a try!  It's a simple, hearty meal that is surprisingly delicious!

We had this for supper last night, and the leftovers for lunch today...and it's just as good the second time around!

Linking up with Farmgirl Friday!

Saturday, January 26, 2013

Cheeseburger Roll Recipe...

Hmmm...two posts in a row about food?  Must be on my mind a lot lately. Oh well...

When browsing my cookbooks for recipes to use in the food co-op, I came across this one that I thought my family might like.  I made it last Saturday for lunch, using a tube of prepared pizza dough because of time constraints. Today I had more time, so I made "the real thing"...using the dough in the recipe.

CHEESEBURGER ROLL...


Dough:
1 cup warm water
1 Tbsp. cooking oil
1 tsp. salt
1 tsp. sugar
1 pkg. yeast
3 cups flour


Filling:
1 lb. ground beef
1/2 cup diced onions
1/4 cup ketchup
1/4 cup prepared mustard
1/4 cup dill pickles, diced
1 cup shredded cheddar cheese
sesame seeds

1.  To prepare dough, mix together water, oil, salt, sugar and yeast.  Mix until yeast is dissolved.  Stir in flour.  Work into a smooth ball.  Leave in bowl and cover to rise.  (I left it rise about 45+ minutes)

2.  Fry ground beef and onions together.  Remove from heat and drain all excess fat.  Mix in ketchup, mustard, pickles and cheese, stirring well.  Set aside.

3.  On a floured surface, roll dough out into a 12" x 18" rectangle.  Spread filling over dough.  Roll up like a jelly roll.

4.  Place seam side down on a greased jelly roll pan.  Brush with water and sprinkle with sesame seeds. (I didn't use sesame seeds...just baked it as is, and sprayed with a  little oil on top to make it brown)

5.  Bake at 350* for 30-35 minutes.  Serve.  (We had ketchup, etc. available as condiments)


I think this just might be a new family favorite!


Wednesday, October 10, 2012

Leisurely Breakfast...

It's dreary out there again today, and a good day to have a leisurely breakfast!  Let me bore you with what we ate this morning...

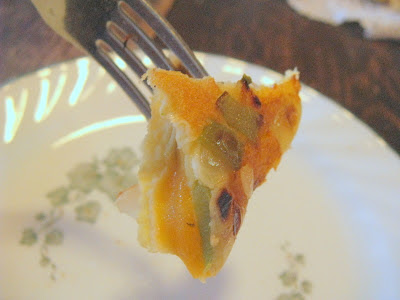
Puffy Breakfast Omelet

Saute (in butter, of course) several tablespoons of onion and green pepper, or veggies of choice.  I found more peppers in my garden yesterday, so I used lots...


Separate the yolks and whites of four eggs (homegrown are best!)...


Beat egg whites until stiff.  Add 2 tbsp mayonnaise, 3 tbsp water, 1/2 tsp salt to the egg yolks and mix well.  Fold the egg white and yolk mixture together.  Pour over sauteed veggies in pan and cook over low heat, uncovered, for five minutes.


Cover the pan and cook for five minutes longer, or until set.  Sprinkle with 3/4 cup shredded cheese, and seasonings of choice.  I used some of the oregano and basil that I grew and dried this summer...


Score the omelet in the middle, fold in half and serve...


Enjoy!


Hopefully you weren't too bored, but your mouth is watering instead!  We don't always take the time to have  a leisurely breakfast, but it sure tasted good this morning.

Now it's time to get back to work.  The kids are back in school after a long holiday weekend, and there's lots of catching up to do.

Sunday, August 19, 2012

Making Grape Juice...

You should see my kitchen.  Or maybe not!

The counters are full of canning jars...a triple batch of salsa made yesterday...and a second batch of grape juice.  The corners are full of canners, large kettles, my food processor, empty canning jars, etc.  And the floor is badly in need of being mopped.  But that's for another day.

We have access to several small grapevines...I'm assuming that they're concord grapes.  The kind that get really dark purple when ripe, and taste good when you first pop them in your mouth and quickly turn tart on you.  What to do with them, other than let the bees have a feast?

I made a batch of jelly two weeks ago, but was looking for something new when I cut the next batch.  I found this quick and easy "recipe" for making grape juice...


Quick and Easy Grape Juice

(this makes a full strength grape juice)

Wash grapes thoroughly and remove stems.

Place one cup of washed grapes in quart canning jars.

Add 1/2 cup sugar to each quart.   (experiment with the amount...my second batch I used less)

Fill jars with hot water, leaving 1/2" head space.

Stir to dissolve sugar.

Process in a hot water bath for 15 minutes.


That's it!  Nothing to it!

Let the grapes sit for several days before tasting the juice...this gives the juice a chance to reach it's full flavor.

Drain the juice and enjoy!

Saturday, June 23, 2012

Bread and Butter Pickles Recipe...

Pop, pop, pop...

It's the sound of jars sealing on the kitchen counter!


The cucumbers are growing fast this year, and today I made my second batch of pickles.  I used to make a lot of pickles using the packets of pickling mix, but last year found this recipe for "from scratch" Bread and Butter pickles.   They've  become one of our favorites and are super easy to make!

I've had only one casualty so far...a jar broke in the canner in my first batch.  That was a mess, but we have 11 pints so far, and the way the cucumbers are looking we'll have a lot more.  I need some more recipes...  


Do you have any favorites to share?


OLD FASHIONED BREAD AND BUTTER PICKLES
slice thinly:
1 gal. cucumbers
2 large onions
-------------------------------------------------------------
Stir to dissolve, and pour over sliced cucumber mixture.  Cover with heavy plate to hold down under water.  Let stand 3 hours.  Drain thoroughly and pack in jars:
 1/2 cup salt
Ice water to cover
-------------------------------------------------------------
Mix together in saucepan.  Heat to boiling and fill jars, leaving 1 inch headspace:
8 cups vinegar
4 cups sugar
4 tsp mustard seed
1 tsp celery seed
1 tsp tumeric
--------------------------------------------------------------


Process in boiling water bath for 10 minutes

One thing I like about this recipe is, that if I don't have enough pickles to use up all the "juice"that the recipe makes, I can just store it in the fridge for a few days and reheat it to do the next batch.

Give it a try...it's easy, and the pickles are delicious!


Sunday, November 20, 2011

Nutella Brownie Cups...

I've been in a bit of a funk this week...nothing has jumped out and said "you've gotta blog about this!"   We've been busy with things that wouldn't really be exciting to write...or read about...

So...maybe it's time to share a recipe!

Anything chocolate...or even remotely related to chocolate...catches my attention.  So when I saw this recipe from a friend on Facebook this week, I had to try it! 

NUTELLA BROWNIE CUPS                    

1/2 cup Nutella spread
1 large egg
5 tablespoons all-purpose flour
1/2 cup chopped hazelnuts (optional)

Instructions:
Line a 12-cup mini muffin pan with paper or foil liners.
Put the Nutella and egg in a medium bowl and whisk until smooth and well blended. Add the flour and whisk until blended.
Spoon the batter into the prepared muffin tins (about 3/4 full) and sprinkle with the chopped hazelnuts.
Bake until a pick comes out with wet, gooey crumbs, 11 to 12 minutes at 350 degrees. 
  I chose to make these without the chopped Hazelnuts, as my family doesn't care for chunks of nuts IN things, and they were delicious without them!
We learned to love Nutella after a trip I took to Germany in 2006 to visit my sister and brother-in-law, who were living in Heidelberg for a year.  I brought several jars back home with me, and they disappeared rather quickly!   I was happy to discover that it's very easy to find locally. We don't buy it often, but when we do, we sure enjoy it!
Finding new recipes that use things we love is great fun...thanks Julie!


Thursday, August 11, 2011

Salsa Recipe...

One of my favorite things to do each summer, is to make salsa...


Actually, let me correct that statement..."One of our favorite things to eat is home canned salsa!"


All of the scalding, peeling, chopping and canning is rather time consuming, but oh, so worth it for the delicious jars of mouth watering salsa that we can eat all year long. This year I invested in a food processor... mainly for the purpose of chopping all those tomatoes, and was it ever worthwhile! And...today Jenna helped me to peel them...even better!

Enough said. Here's the recipe. It is NOT original with me, so I can take no credit, but it's hands down the best we've tried so far...


SALSA

Combine the following ingredients and set aside:

14 cups tomatoes, peeled, chopped and drained
3   cups onion, chopped
1/2 cup chili peppers, chopped
1 - 3 cups green, yellow or red peppers, chopped
8 - 10 cloves garlic, chopped

Combine in a saucepan, and cook until slightly thickened:

1 cup tomato sauce
1 cup ketchup
3/4 cup vinegar
10 Tbs. corn starch
2 1/2 Tbs. salt
1 Tbsp chili powder
1 1/2 tsp. cumin

Mix cooked sauce together with drained veggies.

Fill pint jars, leaving 1/2" head space.  Process in a hot water bath for 35 minutes.  Makes 10 + pints.

After opening, you may add corn and/or black beans to the salsa.  If you want to add them before canning, you would then need to use a pressure canner for processing.  (time and pressure were not provided in the recipe)

One batch down...at least two more to go! 

Friday, June 24, 2011

Refrigerator Pickles ...

My family loves pickles...so I planted lots of cucumbers in the garden this spring. 

The plants have taken off, and to my surprise, this morning when I checked I had a bunch of mature cucumbers ready to be picked.  Cucumbers have a way of sneaking up on you like that, don't they?!

In the past, I've not had a lot of luck with keeping cucumbers nice in the refrigerator until I have a quantity large enough to make a batch of pickles.  So...what do you do when you have just a few...more than enough to eat fresh, but not enough to can?

Try these Refrigerator Pickles...


Refrigerator Pickles

Prepare 3 quart jars for pickles. 

Slice 1 medium onion into the bottom of each jar

Fill the remainder of the jar with cucumbers, sliced 1/8"- 1/4" thick

Stir the following ingredients together to make syrup.  Do NOT heat...syrup is used cold

4 cups sugar
3 cups vinegar * if vinegar is mild, use 4 cups and omit water
1 cup water
1/2 cup salt
1 1/4 tsp tumeric
1 1/4 tsp celery seed
1 1/4 tsp mustard seed

Stir until sugar is dissolved.  Pour over cucumbers in jars just enough to cover.  Screw on lids.

Refrigerate at least 5 days before using.  These pickles will keep in the refrigerator for as long as 10 months!


My sister told me about this recipe a number of years ago, and I remember that we loved them!  It's a quick, easy way to make delicious pickles without making the kitchen a hot, sticky mess...just what I needed today, especially since I just mopped my kitchen floor!  :)

Wednesday, June 22, 2011

Meadow Tea Recipe...

What is better on a hot, humid summer day, after working outside, than a cool, refreshing drink of Meadow Tea...or maybe you call it Garden Tea, or something else entirely! 

Almost every summer, there is a friendly debate on facebook among some of my friends over the name for this summertime drink!  Apparently, according to what part of Pennsylvania you hail from, the name is different! 

We call it Meadow Tea, I guess, because it is often found growing wild along the edge of the meadow.   While I do have some "wild" tea, the leaves that I use come from plants that I purchased at a local greenhouse and planted where I wanted it.  There are lots of varieties available to choose from.  ( I think mine was actually called Chocolate Mint)  I now have enough tea to feed the entire neighborhood...it spreads that quickly.  But my family loves it, and I'm hesitant to say just how quickly a gallon is consumed!


This is the recipe that I use most often...

Fresh Meadow Tea
(makes 1 gallon)

Bring to a boil:

     2 cups sugar ( I skimp on the sugar! )
     4 cups water

Pour over:
     2 cups mint leaves, packed (and thoroughly washed!)
     2 sliced lemons

Let stand overnight.  Strain off concentrate and store in the refrigerator.  When ready to serve, pour into a gallon container and fill with water and ice.

*This freezes well!  I usually cut all of my tea at once, and make several batches.  I store the concentrate in quart sized containers, and they each make one gallon of delicious Meadow Tea!


So...what do you call this delicious drink?

Just and update to the recipe...I learned another way to make this from a friend, which I personally like even better!  Here it is...

*Bring 6 cups of water to a boil 
*Add a large handful of tea leaves, rinsed
*Let them steep for about 30 minutes
*Remove leaves and drain the "tea"
*Add 1/2 cup sugar and stir until dissolved
*This makes enough concentrate for 1 gallon of tea

This recipe is much quicker to make, the tea is much lighter in color, and it's not nearly so sweet!

Friday, May 13, 2011

Rhubarb Recipes...

Do you like the taste of rhubarb?   
We do, and Jim's Aunt and Uncle have a large patch of rhubarb that they are willing to share.  This is the time of year that it's found in abundance, so I've been scouring cookbooks, looking for new recipes.  
Here are a couple of new recipes that I tried this week...
Rhubarb Bread...and Rhubarb Jelly...


Rhubarb Bread
1 1/2 cups brown sugar
2/3 cup oil
1 egg
1 cup sour milk
1 tsp salt
1 tsp baking soda
1 tsp vanilla
2 1/2 cups flour
1 1/2 cups rhubarb, chopped
Topping

1 1/2 cups brown sugar
1/2 tsp cinnamon
1 Tbsp melted butter
1/2 cup chopped nuts
Combine ingredients and pour into 2 or 3 greased loaf pans.  Sprinkle with topping and bake at 325* for 40-50 minutes.
Best served warm, this bread also tastes great spread with butter and fresh Rhubarb Jelly!

Rhubarb Jelly
5 cups Rhubarb, finely chopped
4 cups sugar
1/3 cup strawberry gelatin
Mix rhubarb and sugar; let stand overnight.  Cook 5 minutes and add gelatin.  Stir well and put into jars immediately.  Seal.
*I didn’t seal the jars, but instead put them in the refrigerator.  We’ll use them fast enough, or I might give some to a friend or two.  The jelly seemed rather runny at first, but when chilled, set quite nicely.
If you have access to rhubarb, give them a try...I won't guarantee they'll last long!


*Linking to Farm Friend Friday and Farm Girl Friday...

Monday, March 14, 2011

A Homemade Kind of Day...

Spring's just hanging around the corner, tempting me to get out there and get my hands in the dirt, but Winter's still got a bit of a grip on me!  It was one of those days today where the wind had a cold, damp edge to it.  I hung out some wash, nailed it to the line, and then decided that today would be a good day to heat up the kitchen and make some homemade goodies...


But first, I'd like to say a big THANK YOU to Teresa, at Eden Hills!  A month or so ago, I participated in a "Pay it Forward" on her blog, and today in the mail I received a package...of homemade goodies!  The package contained a bar of her homemade Lavender Goat's Milk Soap ( I was hoping to try it! :)   and a jar of her homemade lavender bath salts.  They smell lovely, and I can hardly wait to try them!  Thanks Teresa!


Back in the kitchen, I decided to try my second round of homemade biscotti.  I tried it for the first time last week, and it didn't last long, so I decided to make a second batch.  I tweaked a few things, and I'm pleased with the result...I don't think this batch will last very long either!  If you're hungry, stop in for a cup of coffee and a sweet treat!


The recipe is a little time consuming, but it's rather simple, and tastes delcious with a cup of coffee or hot chocolate...

CHOCOLATE-ALMOND BISCOTTI
1 1/2 cups sliced almonds, toasted, divided
2 sticks (1 cup) butter, softened
2 cups sugar
2/3 cup unsweetened cocoa powder
1 tsp. baking powder
1 tsp. baking soda
1/2 tsp. salt
3 eggs
1 tsp. almond extract
3 1/2 cups flour
4 blocks white almond bark, melted

1. Preheat oven to 350.  Lightly grease a cookie sheet and set aside
2.  Place 3/4 cup almonds in food processor and pulse until ground ( I just crushed them)
3.  In large bowl, beat butter with mixer.  Add sugar and 3/4 cup almonds.  Mix well.
4.  Add cocoa powder, baking powder, baking soda and salt.  Beat until combined
5.  Beat in eggs and almond extract
6.  Add flour by cupfuls, mixing well after each addition.  Batter will be quite stiff.  You may need to add the last of the flour by hand
7.  Stir in remaining almonds by hand.
8.  Divide dough in half.  On waxed paper, with floured hands, shape dough into two 14" long rolls.
9.  Place on greased and floured cookie sheet, at least 5" apart.  Flatten slightly.
10.  Bake 25-30 minutes or until wooden pick inserted near center comes out clean.
11.  Cool on cookie sheet for one hour.  On a cutting board, cut each roll diagonally into 1/2" thick slices (about 24 slices from each roll)
12.  Place slices, cut side down, on the same cookie sheet you used for the first baking.  Bake at 350 for 8 minutes.
13.  Turn slices over and bake 7-9 minutes longer, or until cookies are dry and beginning to get crisp.
14.  Remove from cookie sheet to wire racks.  Cool completely.
15.  When cool, drizzle with melted almond bark.
16.  Store in an airtight container.

Enjoy with a cup of your favorite hot beverage!

And remember...spring really IS just around the corner!

Monday, February 28, 2011

Shoofly Cake Recipe...

It's hard to believe that I've lived in Lancaster County all my life, and have never made a shoofly pie!  I don't do pie crusts, and we've had so many opportunities to enjoy them over the years that I've just never bothered.

I found this recipe, however, for Shoofly Cake that is scrumptious!  I'm embarrassed to say how long it lasted...or not! 

Give it a try...I don't think you'll be disappointed!

*this is especially good when enjoyed warm, right out of the oven...


SHOOFLY CAKE
4 cups flour
2 cups brown sugar
1 cup butter or margarine
2 cups boiling water
1 cup molasses (regular baking molasses...not Black Strap!)
2 tsp baking soda

1.  Combine flour, brown sugar and butter until crumbly.  Reserve 1 ½ cups crumbs for topping.
2.  Combine boiling water, molasses and baking soda.  Stir into remaining crumbs and mix well.  Pour into floured baking pan.  Sprinkle with   1 ½ cups reserved crumbs.
3.  Bake at 350 for 35-40 minutes, or until toothpick inserted in center comes out clean.


Thursday, January 20, 2011

A Granola Making Day...

I had a bit of free time today, so I decided to make some granola.
 A friend of mine (thanks Sue!) used to make this for Christmas, and we learned to love it.   I’ve taken a few liberties with the recipe (some in our family don’t care for sesame seeds or coconut, so I added more dried fruit instead!)  It’s very simple to make... the baking is a bit time consuming, but it's worth it! 
 If you have a lot of inside work that needs to be done...you can fit it in between "stirrings"...just so you're close enough to hear your timer go off!  I got my laundry folded and some bookwork (yuck) done while it baked this morning.

MAPLE GRANOLA
Combine in a large bowl:
                 2 lb 10 oz rolled oats (large container)
                2 cups wheat germ
                1 cup chopped almonds (I use the raw, slivered almonds)
                1 cup chopped raw (or unsalted) cashews
                1 cup raw (or unsalted) sunflower seeds
                several cups bran flakes (optional)
Combine and pour over dry ingredients:
                2/3 c. vegetable or canola oil
    2 + cups pure Maple syrup (I use maple flavored pancake syrup, since the real stuff is so expensive!)
                1 tsp. vanilla

Combine and set aside until after baking:
                1 -2 cups dried fruit (craisins, pineapple, papaya, apricot, etc)

Preheat oven to 350 degrees.
Pour onto a well greased jelly roll pan. (This recipe is large enough that it will take at least 3 jelly roll pans full until you're finished, so plan when you have a large chunk of time!)
Bake for 30 minutes, stirring every 10 minutes.
Remove when lightly browned.
Add dried fruit and cool.
Store in an airtight container.

The second pan is almost finished in the oven…and it’s beginning to smell pretty good in here!
Here’s the finished product…   

We'll be eating granola for weeks! 

Tuesday, January 11, 2011

Bread recipe...

I'm sitting here this morning, trying to get myself to pull on my insulated coveralls and head out to the barn.  I'm imagining what all could happen today...

It's supposed to snow...the kids could get home early from school...they might want to go sledding...the dogs will have a blast with unexpected playmates...the hot water might be on for hot chocolate...

And wouldn't the smell of baking bread top it all?!

Here's a recipe that a friend from Church gave to me last winter.  It's the simplest, most forgiving bread recipe I've ever tried. 

3 cups lukewarm water
1 1/2 Tbsp. kosher salt
1 1/2 Tbsp. dry yeast
6 1/2 cups unsifted, unbleached flour  ( I use 4 cups white, and 2 1/2 cups of something else...oat flour, whole wheat, etc.  He suggests adding sunflower seeds or flax...)

Mix together until incorporated.  (add flour or water as needed)  It will be a sticky dough.
Let rise for 2 hours minimum at room temperature.
(at this point you can bake it, but it handles better if it rises a little longer)

Divide the dough in half and shape into two cantalope sized balls.  Let it rise on a pizza pan coated with cornmeal.  Let it rise for 40 minutes.

Place a baking stone on the middle oven rack and coat with cornmealPlace a shallow pan on the bottom oven rack.  Preheat oven to 450 degrees.  (time it so that oven is ready at the end of the rising time for your loaves of bread)

Dust the top of the loaves with flour, and make of a couple of slices on the top with a serrated knife.  Transfer to baking stone in oven.

Immediately pour about a cup of water into the shallow pan.  This creates steam to make a nice crust.  Bake for about 30 minutes, or until crust looks and feels right.


So...if you're feeling adventurous, or if the smell of fresh baking bread appeals to you...give it a try!  A slice a warm, fresh baked bread slathered with butter and homemade strawberry jelly...sounds good to me!

Thanks, Leon, for the recipe!